Food containers seem harmless until mismatched lids fall from an overcrowded cabinet. A practical storage system can save time, protect containers, and reduce unnecessary household waste. This guide explains how to organize food containers properly using simple habits that work in real kitchens.
Begin by emptying one shelf or drawer completely. Match every container with its lid before deciding where it belongs. Place larger boxes at the back and smaller ones near the front. Store containers with their lids loosely attached, or stack lids vertically in a narrow divider. This makes each piece visible and easier to reach.
Clear plastic bins can hold small containers, silicone bags, or spare lids. They also prevent loose items from spreading across the shelf. Keep frequently used meal-prep boxes between waist and eye level. Reserve higher shelves for occasional serving dishes. Check that containers are dry before storage, because trapped moisture can create unpleasant odors.
Different materials need different care. Glass containers are stable but heavy, so lower shelves usually provide safer access. Lightweight plastic containers should stay away from excessive heat and direct sunlight. Always follow the manufacturer’s instructions for microwaves, freezers, and dishwashers. Labels can help, but too many become confusing.
Be realistic about your collection. Some containers may be stained, warped, or missing their lids. Keeping them “just in case” often creates more clutter. Still, my own system has needed adjustment after busy weeks and rushed cleanup. Review the arrangement occasionally, and change it when your cooking habits change. A useful system should feel effortless, not perfect.
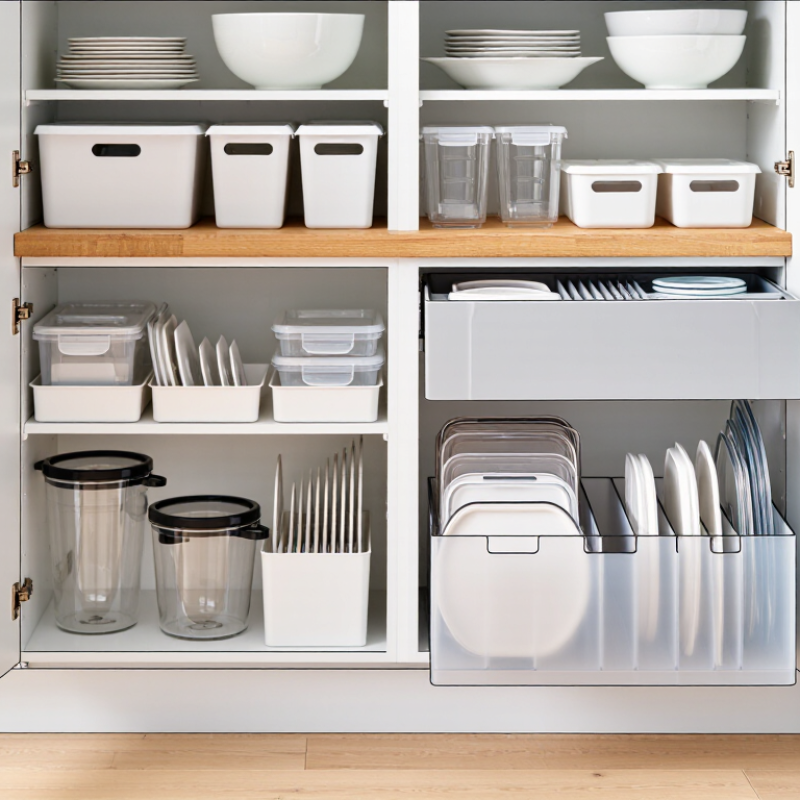
Before organizing food containers, empty the entire cabinet and inspect every piece. Check each container for cracks, stains, warped edges, or lids that no longer fit. Discard damaged items responsibly. Group containers by shape and size, then match each lid to its base. A container without a reliable lid creates clutter. I once kept several “almost matching” lids, thinking they might become useful. They never did.
Assess how you actually store food during a normal week. Count the containers used for leftovers, packed lunches, dry ingredients, and freezer portions. Measure the available shelf height and depth before buying or keeping more pieces. Tall containers may suit soup, while shallow ones can cool leftovers faster and stack neatly. Leave room for your hands to remove items. A crowded shelf is difficult to use safely.
Choose a storage method that matches your habits, not an idealized kitchen. Nest containers by size, and keep their lids upright in a small divider or shallow basket. Store frequently used pieces at eye level. Labeling can help when several containers look similar, though excessive labels may become another chore. My first estimate was wrong; I needed fewer containers but more medium-sized ones. Recheck the collection after one week. Daily use reveals problems that careful planning can miss.
| Container Category | Current Quantity | Useful Capacity | Typical Food Use | Recommended Storage Zone | Space Requirement | Collection Assessment | Organization Action |
|---|---|---|---|---|---|---|---|
| Small Containers | 8 | 250–500 ml | Dressings, sauces, nuts, small leftovers | Upper cabinet or shallow drawer | One divided section | Adequate | Stack by size and keep lids beside them. |
| Medium Containers | 10 | 750 ml–1 L | Individual meals, cut fruit, vegetables | Eye-level cabinet shelf | One standard shelf | Adequate | Place the most-used sizes at the front. |
| Large Containers | 6 | 1.5–2.5 L | Batch cooking, salads, family leftovers | Lower cabinet or deep drawer | One deep shelf | Review | Nest empty containers to reduce vertical space. |
| Rectangular Containers | 9 | 500 ml–2 L | Meal portions and refrigerator storage | Front-to-back cabinet stack | Approximately 30 cm shelf depth | Efficient | Align corners and group by footprint. |
| Round Containers | 5 | 500 ml–1.5 L | Soups, stews, grains and sauces | Separate cabinet section | More unused space between items | Review | Keep only frequently used sizes together. |
| Freezer-Safe Containers | 6 | 500 ml–1 L | Frozen meals, broth and prepared ingredients | Freezer drawer or dedicated shelf | Leave expansion room around contents | Adequate | Label contents and date before freezing. |
| Glass Containers | 4 | 750 ml–1.5 L | Oven-to-table meals and reheating | Lower cabinet near the oven | Heavier shelf-load requirement | Review | Store lids vertically and avoid overstacking. |
| Lids Without Matching Bases | 7 | Mixed sizes | Not currently assigned | Dedicated lid organizer | One narrow vertical section | Excess | Match, recycle or remove unpaired lids. |
| Damaged or Stained Containers | 3 | Mixed sizes | Limited or unsuitable use | Do not return to active storage | Recover approximately 10–15% of space | Remove | Discard damaged pieces and retain usable lids only when matched. |
| Daily-Use Set | 12 | 500 ml–1 L | Work lunches, snacks and routine leftovers | Most accessible cabinet shelf | One front-access section | Priority | Keep at waist-to-eye level for quick access. |
Assessment basis: The collection contains 70 total pieces, including 61 containers and 9 loose or damaged pieces. A practical target is to keep matching, usable containers that fit the household’s meal-preparation habits and available cabinet space.
Empty the entire cabinet and inspect every container. Check for cracks, stains, warped edges, and loose lids. Discard damaged pieces responsibly. Do not skip this step.
Count containers used for leftovers, lunches, dry ingredients, and freezer portions. Measure shelf height and depth before keeping extras. Daily habits reveal more than careful guesses. My first estimate was wrong.
Group containers and lids by shape and size. Match each lid to its base before storing anything. A lid that almost fits is usually clutter. It fooled me once.
Nest containers by size when their shapes allow it. Keep lids upright in a shallow basket or narrow divider. Store heavy containers on lower shelves. This reduces falling stacks.
Square and rectangular containers usually leave fewer empty corners. Round containers suit soups and foods needing easy stirring. Do not force mismatched pieces together. They often fall out later.
Keep daily-use pieces between waist and shoulder height. Place small containers near the front for sauces and chopped herbs. Store larger pieces together. Access matters more than appearance.
Label leftovers with their preparation date and expected use date. Labels also help distinguish shallow sandwich containers from tall grain containers. Use only necessary labels. Too many become another chore.
Reset the drawer once a week and remove unmatched lids. Move older food containers forward and newer ones behind them. Check for forgotten food during a monthly inventory. The system may still fail during rushed evenings. Adjust it afterward.
Learning how to organize food containers properly begins with assessing your collection and identifying your storage needs. Remove damaged or unused pieces, then group containers and lids by size, shape, and purpose. This makes it easier to find matching sets and prevents overcrowded cabinets. Choose practical storage zones based on how often you use each item, keeping everyday containers within easy reach while placing occasional-use pieces in less accessible areas.
Use nesting to fit smaller containers inside larger ones, and stack matching containers with their lids stored nearby or arranged vertically. Labels can help identify sizes, meal portions, or specific uses, especially when containers are stored in drawers or deep cabinets. To maintain the system over time, return every item to its designated place, regularly check for missing lids or damaged containers, and adjust the arrangement as your collection and household needs change. A simple, consistent system can save space, reduce frustration, and make food preparation and cleanup more efficient.

 NIXA Storage